

Design Basics 2d And 3d Ebook Free Download
10 tips for moving from 2D to 3D animation
This article is brought to you in association with Masters of CG, a new competition that offers the chance to work with one of 2000AD's most iconic characters. There are big prizes to be won, so enter today!
It's been at the back of your head for a few years now, just gnawing at you. You've been a professional 2D animator and motion graphics expert for a long time, and you love what you do. But you have to admit that 3D has always been the holy grail destination for the high-end work. Two-d is just amazing, and what can be done with it has keeps getting better and better. But still... 3D has always been there, taunting you.
As a 3D animator, I have often had 2D animator friends that have confided the above feelings to me. They have wanted to make the leap, but let's face it, 2D is faster and more predictable in many production environments. And moreover, there are just more job opps for 2D than there are for 3D. Also, the learning curve for 3D is somewhat daunting. All of this is true. But still... 3D has always been there, taunting you.
The good news
Here's the good news. While 2D is getting more capable (via plugins and application enhancements), 3D has been growing as well. It's been getting easier to learn, and production workflow has been getting faster and more predictable.
Faster computers with multiple cores are a dream come true for 3D needs. Yippee! So making the leap is easier than it's been in the past, making this a good time to jump. Or at least get your feet wet.
Here are 10 tips to help you take your first steps towards 3D, and maybe land on your feet when you finally make the jump.
01. See how far you can push your 2D apps
Take a beat or two before you jump, and see just how far we can push our 2D program's envelope. If you're using Adobe's After Effects for 2D animation, then you can push that envelope pretty darn far.
AE has what is referred to as a two-and a half-D system. What this means is that AE actually has a pretty good understanding of 3D space. When a layer's 3D toggle is checked, that layer (known as an 'object' or 'model' in 3D terminology) will then exist in a space that has X, Y, and Z coordinates, not just the X and Y in 2D. You can then add cameras and lights, and actually work in the XYZ space. You are now a 3D animator! That wasn't too hard at all, was it?
One issue with using After Effects as a 3D application though, is that by default it only supports 2D objects, even within its 3D world. That means no 3D meshes or being able to move around a model. So your animations will have a lot of flat videos and graphics moving in 3D space. This is why it's called 2.5D: the world is 3D, but its inhabitants are still 2D. It's okay, and it's a good place to start getting used to things.
02. Bring 3D geometry into After Effects
Fortunately, there are ways to get around the 2D objects limitation in AE, though it gets a tad complicated, so bare with us.
If you have a version of AE Creative Suite shortly prior to CS6, you can actually use Photoshop Extended's 3D tools to set up a 3D scene and then import that PS file into AE and voila, you have real 3D geometry in AE. Alas, that 'Live Phoshop 3D' functionality was short lived and killed off by AE CS6.
If you have AE Creative Suite 6, through any version prior to Creative Cloud 12, there are a number of third party programs that can be added as plugins that will allow you to actually import 3D geometry, and even do varying degrees of stuff with it once imported. These applications include Zaxwerks 3D Invigorator Pro, Video CoPilot's Element 3D. These plugins do far more than just import 3D mesh, offering a great deal of control and features. Check them out!
03. Get a major 3D package for free
Now, if you have AE CC 12 and later, you are in for a treat. It now comes with a free plugin that is called Cineware, from the Cinema 4D (C4D) folks. What Cineware does is link AE to C4D in even better ways than they had been integrated in the past. The real kicker is that AE now even comes with a full version of C4D, absolutely free. This, frankly, is awesome, cool, and a general game-changer all around. (And something this author predicted about 10 years ago and was laughed at for. Well HA! Back at them now!)
The scope of what can be done with this major integration is talked about in great detail here. And tutorials on its use can be seen at both Adobe's website and Greyscale Gorilla. This is going to usher in a new era of media creation - just watch and see!
04. Choosing your 3D application
The free copy of C4D with AE CC is just great. C4D Lite is a great program, fun to learn, and knowing it is a good investment because its older sibling versions have made great inroads into the industry (i.e., job opps!) But the combination of AE, C4D and Cineware is complex and may involve a steeper learning curve than some of you want to deal with.
There are other programs out there that are simpler to learn and use, which you may prefer. Using one of them, and then rendering out the 3D animations in the more traditional workflow is still a great way to go. There are so many 3D applications to choose from.
On the easier to use side of things, you may wish to look at Art of Illusion, which is a simpler program to master and also available free. A similar program is 3Dcrafter, which is available in three versions, priced at free, $35 and $70. Depending on the type of work you will be doing, don't forget about programs like Sketchup and Daz3D, which both have free versions and reasonably priced advanced versions.
Stepping up a big notch there are a number of programs. A longtime personal favorite is Electricimage Animation Studio, which has a long heritage and has been used on Star Wars, Star Trek, Hook, Super Bowl graphics and so much more. It has a powerful and generally easy to use interface, and has been a longtime fan of motion graphics designers moving to 3D.
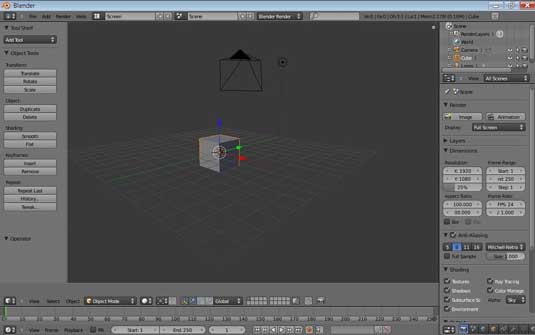
In the similar level arena is Blender, which is an open source package that just keeps getting better and is a great tool to know. The community they have built, and the quality of the output is kickass, as you can see from these demo reels.
There are many others you may wish to explore, like Lightwave, 3DS Max and higher versions of Cinema 4D. All of these are more significantly priced purchases.
05. Lest we forget about Photoshop 3D
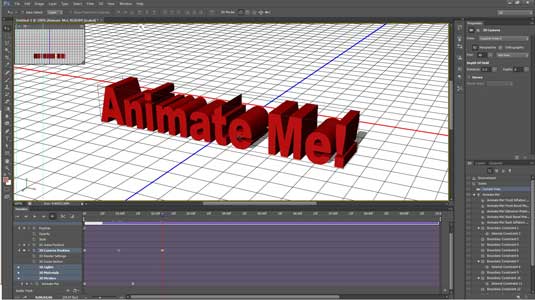
For those of us doing animations that may be a bit less demanding, let's not forget about a great tool you almost certainly already have: Photoshop. If you have any version since CS3, then you have some level of 3D animation ability already at your disposal. If you have a version Photoshop CS6 or later, then you have even more enhanced toolsets and abilities, as Adobe did a nice overhaul around that time.
If you don't have a reasonably recent graphics card with the Mercury engine built in, then you may find performance hard or even impossible to work with, so test this out. Though a powerful new video card can be had for less than buying a midrange animation package, so weigh your needs.
If you have Photoshop and appropriate hardware in place, give it a whirl and see if it meets your needs. Best uses for Photoshop 3D is for illustration and presentation/mock up prep, and also for animations that fall into more of a multimedia type category, like online deliver and similar needs.
You are not likely to be doing blockbuster films or even broadcast work here, but if used appropriately, it can be a fantastic addition and transition from where you are, to where you want to go. And the workflow from PS to AE couldn't be easier.
06. Develop your 3D style by working off your 2D style
As a 2D animator and mograph artist you have some serious skill sets. Not only do you know your tools (well, hey man, you'd better), but you have a design esthetic that is (fill it in here: 'cutting edge', 'classic', 'edgy', 'corporate', etc.). As you jump into 3D you may find it hard to translate your 2D style into 3D. My suggestion is: don't try.
Instead, work backwards in your planning of projects, at least for a while. It's all too easy to allow the 3D tools to hijack your creative process and send you off in directions you don't need, and don't have time for. Think about what you would do in 2D, and try doing much the same thing in 3D, just with some added value. Or better yet, and easier, just stay with your design and production work in 2D, and little by little add more 3D into the mix.
Some of you will find a home with small amounts of 3D in your future mix, and some will find yourselves being brought over to the other side and end up living in 3D. It's all good. Just let your creative juices and comfort levels take you where you need and want to go (okay, yeah, your employer may have a say here, we get that part of life too. But you'll make it work.)
07. To model or purchase
With 3D having so much to learn, it's just fine if you offload some of the work. For a time, or even forever, there's no requirement that you learn it all. For example, when you did all those great motion graphics animations, it's probably a safe bet you didn't always shoot all the video footage that was used, right? And tell us you never bought some stock photos? Yeah, right. So feel free to go to some of the wonderful 3D modeling sites and grab some meshes.
There are plenty of commercial sites, but there are also many freely downloadable sites as well. We've come to realize that the quality of the meshes is not always as linked to the cost factor as you may assume. Also, some meshes come with textures, and some do not.
Last item to keep in mind is format. Make sure the models you get are importable by your 3D software. Unfortunately, even if all the specs seem right, there will be times that some models just refuse to be imported correctly. This happens and isn't always anyone's fault. There are many mesh format converters available, some for free. Sometimes running a model through a converter solves a problem. Then again, there are the times all this does nothing more than thin the hair on your head.
08. Scene building
Unlike in 2D, 3D requires actually building a scene. At least sort of. For example, you can usually get away with building far less than one might first think. This is a lot like building a Hollywood or theatrical stage set, you really just need to cover any area that will be seen. A lot can be faked out with art mapped to flat planes.
As you start in 3D, you may even want to skip creating scenes and just focus your attention on models that are set up and animated, and then rendered. The backgrounds or 'scenes' can be created in your 2D compositing program instead.
In any case, start off slow. For goodness sake, don't jump in thinking of recreating a photorealistic human week one. Leave that to week three, okay? (And maybe take a look at Poser). There is so much creative work that can be done with simple models, simple texture mapping, and some easy animation work. As you progress, you will get a better feel for what needs to be done in 3D (read: slower), and what can be handed off to 2D (read: done faster).
Take a simple example: You have a spinning top (that old fashioned kids toy, remember?) that is dropped and bounces. Sure, the whole animation can be done in 3D. But instead you could just do a simple 360 degree rotation animation of the top (really more like ~350 degrees so as not to repeat the original position twice!). Then take that into 2D and loop the short clip to repeat. Once looping, you can now take the clip and animate it falling and bounding in 2D. ( A great tip for this is to use your compositor's 'look at' function to make the flat rendered top animation always face the camera. This way you can actually move the 2.5D camera around the scene a bit and not give away the fact that the spinning top is really flat.)
09. Rendering
Entire books have been written on this subject. So what I will impart to you here will be desperately wanting, but here it goes... Basically speaking, there are two general levels of rendering quality, high-end/exotic (raytrace, global illumination, occlusion, etc.), and the more pedestrian variety (phong, gourand).
Many times, a lot of great work can be done with the more pedestrian levels of rendering, which is a lot faster. As video cards improve, it's also becoming possible to do real time rendering that is usable for many applications (as is done in games).
Rendering smartly can mean the difference between the render job taking a day, or a week. Or at least whether you get home in time for dinner. So before you turn on those raytraced shadows, think about what look you are going for, and what will be done to the animations in post. You may not need it. Try not to get seduced by all those buttons!
10. Remember: it all ends up back in 2D
The one thing that many people forget is that ultimately, all your work is going to end up back in your 2D compositing program. This is good to keep in mind because it gives you a lot more control. What kind of control? You should know what kind, you are the 2D animation/mograph expert here. The truth is we can take the simplest of images and throw on so many techniques (not to be confused with filters, right?) and make it interesting. And maybe more to the point, clean up the mess we sometimes make in our 3D work!
Words: Lance Evans
Lance Evans is creative director of Graphlink Media. He has written books on 3D, and produced the 3DNY Seminars for Apple and Alias.
Win a trip to SIGGRAPH!
Masters of CG is a competition for EU residents that offers the one-in-a-lifetime chance to work with one of 2000AD's most iconic characters: Rogue Trooper.
We invite you to form a team (of up to four participants) and tackle as many of our four categories as you wish - Title Sequence, Main Shots, Film Poster or Idents. For full details of how to enter and to get your Competition Information Pack, head to the Masters of CG website now.
Enter the competition today!
Related articles
Design Basics 2d And 3d Ebook Free Download
Source: https://www.creativebloq.com/audiovisual/2d-3d-61411925
Posted by: casianolous1944.blogspot.com
0 Response to "Design Basics 2d And 3d Ebook Free Download"
Post a Comment